AWS
AWS EC2 Blue/Green Deployment (Feat. Jenkins, CodeBuild, CodeDeploy) - Part 2
- -
2023.10.05 - [AWS] - AWS EC2 Blue/Green Deployment (Feat. Jenkins, CodeBuild, CodeDeploy) - Part 1
이전글에 이어서 Jenkins 구성 및 Build, Deploy 를 진행합니다.
Source Code Tree
Source Code 는 아래와 같은 구조로 되어있습니다.
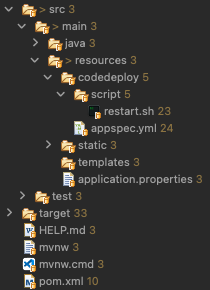
src/main/resources/codedeploy 하위에 AWS CodeDeploy 에서 사용될 파일들을 포함합니다.
(appspec.yml 및 restart.sh)
part1 에서 설정한 buildspec 의 artifacts 내용에 따라 아래 파일들이 zip 파일로 압축됩니다.
discard-paths : yes 를 설정해야 모든 파일들이 root 디렉토리에 위치하게 됩니다.
artifacts:
  files:
    - target/demo-0.0.1-SNAPSHOT.jar
    - src/main/resources/codedeploy/*
    - src/main/resources/codedeploy/script/*
  name: "#${CODEBUILD_BUILD_NUMBER}-demo-application-$(date +%y%m%d%H%M).zip"
  discard-paths: yes
CodeBuild 에서 사용될 appspec.yml 과 AfterInstall 에서 사용될 restart.sh 입니다.
appspec.yml
version: 0.0
os: linux
files:
  - source: /
    destination: /home/ec2-user/app/
    overwrite: yes

permissions:
  - object: /
    pattern: "**"
    owner: ec2-user
    group: ec2-user
    mode: 755

hooks:
  AfterInstall:
    - location: restart.sh
      timeout: 60
      runas: ec2-user
restart.sh
#!/bin/bash
BUILD_JAR=$(ls /home/ec2-user/app/*.jar)
JAR_NAME=$(basename $BUILD_JAR)
echo "## build name: $JAR_NAME"

echo "## copy build file"
DEPLOY_PATH=/home/ec2-user/
cp $BUILD_JAR $DEPLOY_PATH

CURRENT_PID=$(pgrep -f $JAR_NAME)
echo "## current application pid: $CURRENT_PID"

if [ -z $CURRENT_PID ]
then
  echo "## application is not running"
else
  echo "## kill -15 $CURRENT_PID"
  kill -15 $CURRENT_PID
  sleep 5
fi

DEPLOY_JAR=$DEPLOY_PATH$JAR_NAME
echo "## DEPLOY_JAR: $DEPLOY_JAR"
nohup java -jar $DEPLOY_JAR  > $DEPLOY_PATH/nohup.out 2>&1 &
Jenkins
Jenkins 설치 및 Plugin 설치
EC2 에 Jenkins 를 설치합니다. 자세한 설치 가이드는 아래 공식문서를 참고하시면 됩니다.
https://www.jenkins.io/doc/book/installing/docker/
Docker
After downloading, installing and running Jenkins using one of the procedures above (except for installation with Jenkins Operator), the post-installation setup wizard begins. This setup wizard takes you through a few quick "one-off" steps to unlock Jenkin
www.jenkins.io
Jenkins 설치 완료 후 아래 플러그인을 설치합니다.
- CodeBuild Plugin : https://plugins.jenkins.io/aws-codebuild/
- Extensible Choice Parameter : https://plugins.jenkins.io/extensible-choice-parameter/
Jenkins 구성
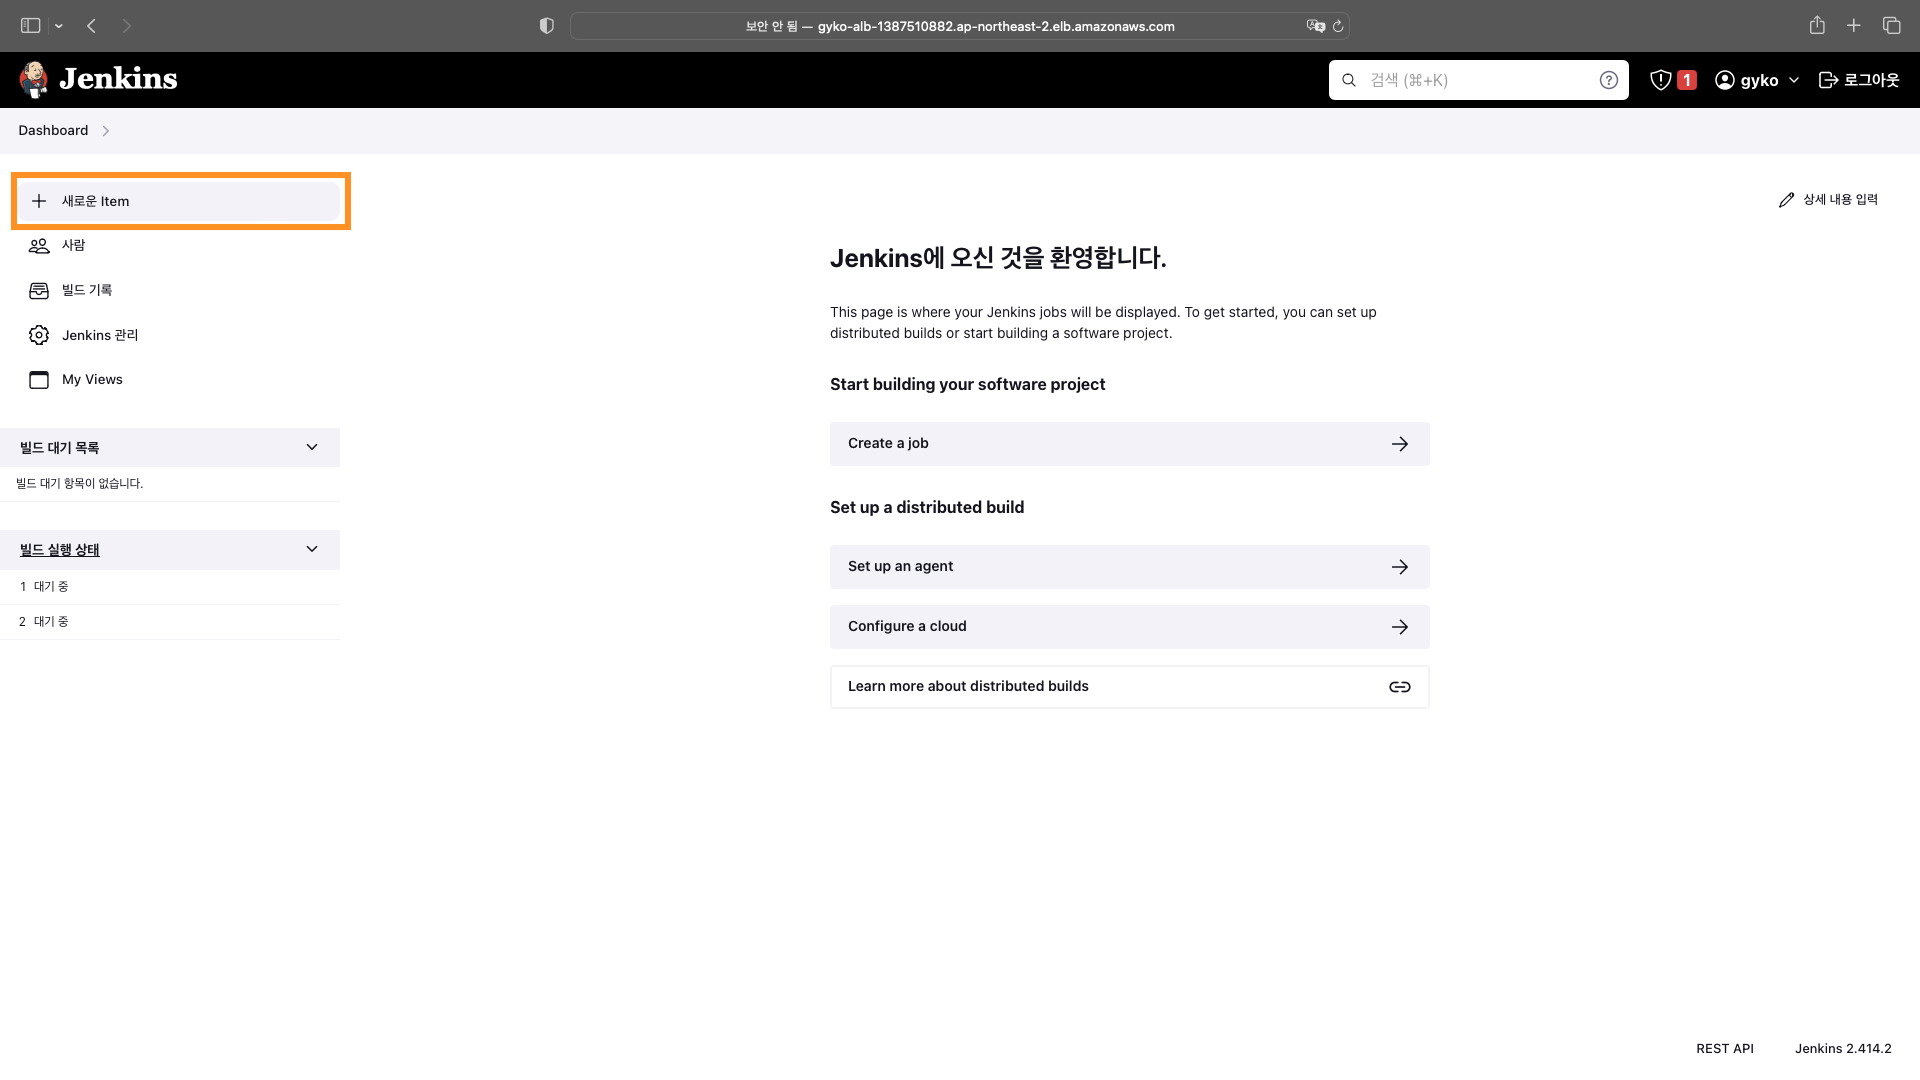
Jenkins 설치 완료 후 로그인 하여 폴더와 프로젝트를 생성합니다.
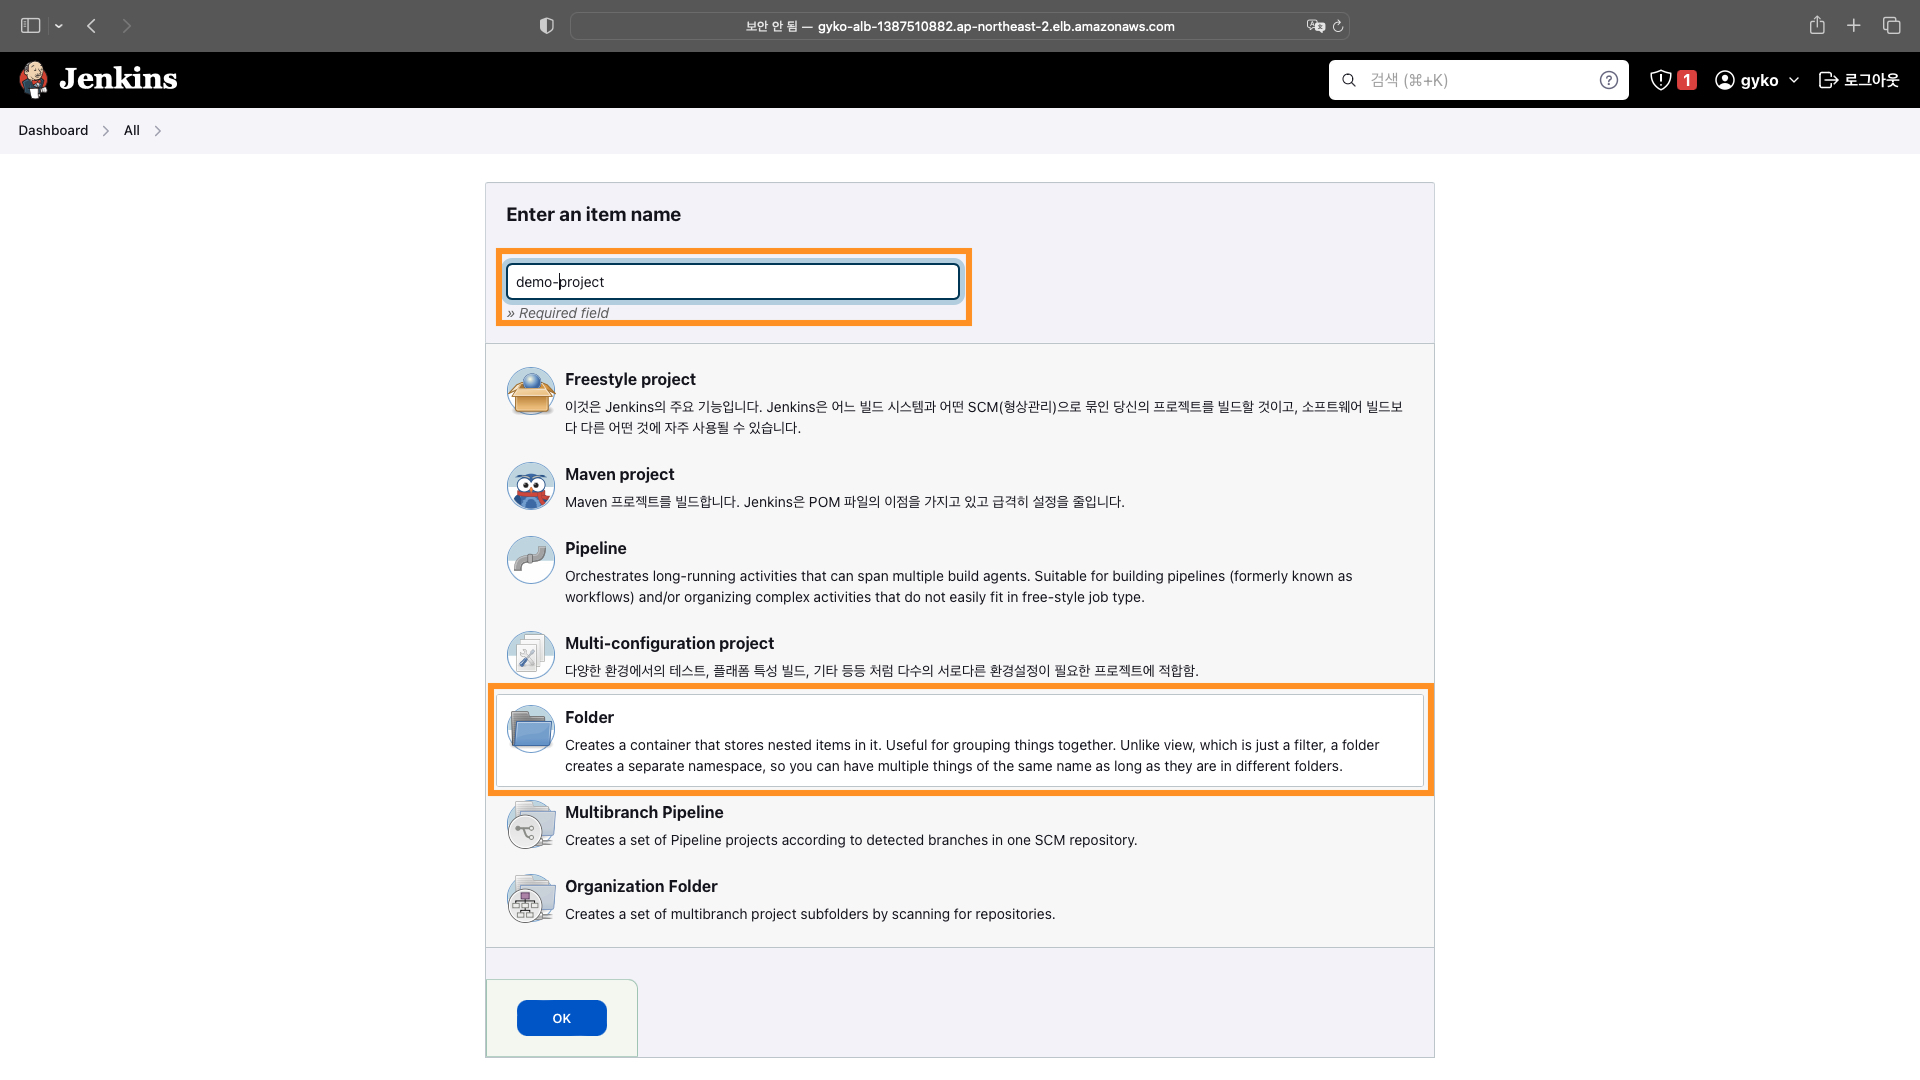
폴더생성
Jenkins 메인 페이지에서 아래 이미지를 참고하여 폴더를 생성합니다.
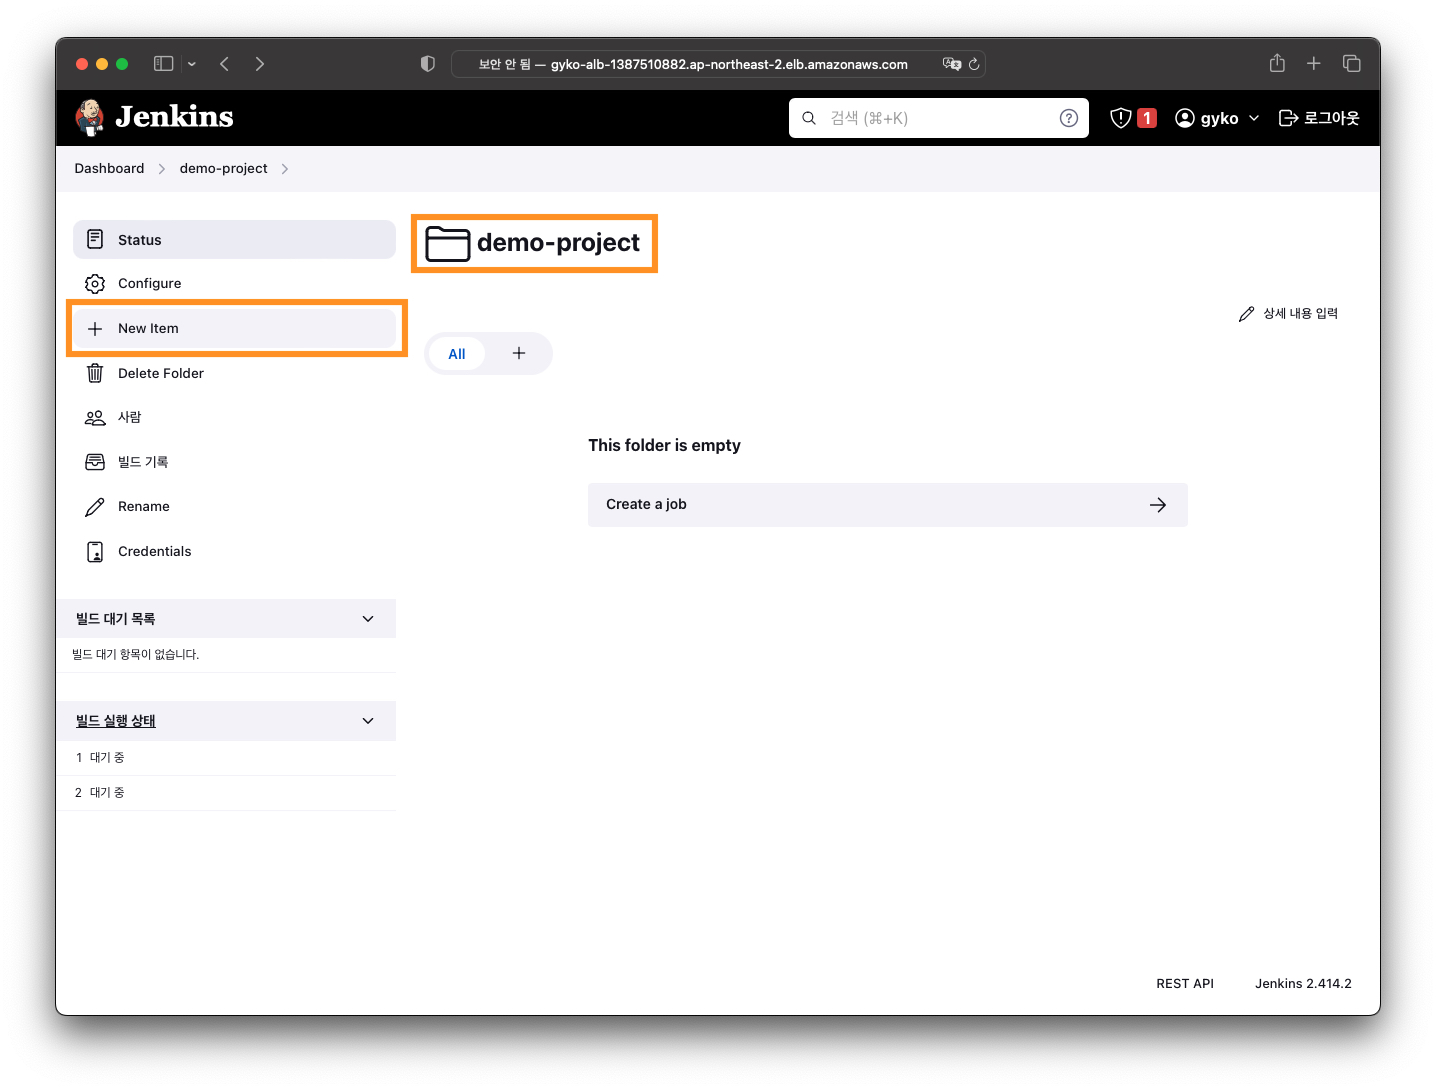
Build 프로젝트 생성
아래 이미지를 참고하여 생성된 폴더 내에 Freestyle project 를 생성합니다.


Repository 설정
소스 코드 저장소를 Jenkins 와 연동합니다.
이 예제에서는 svn 을 사용하였습니다.
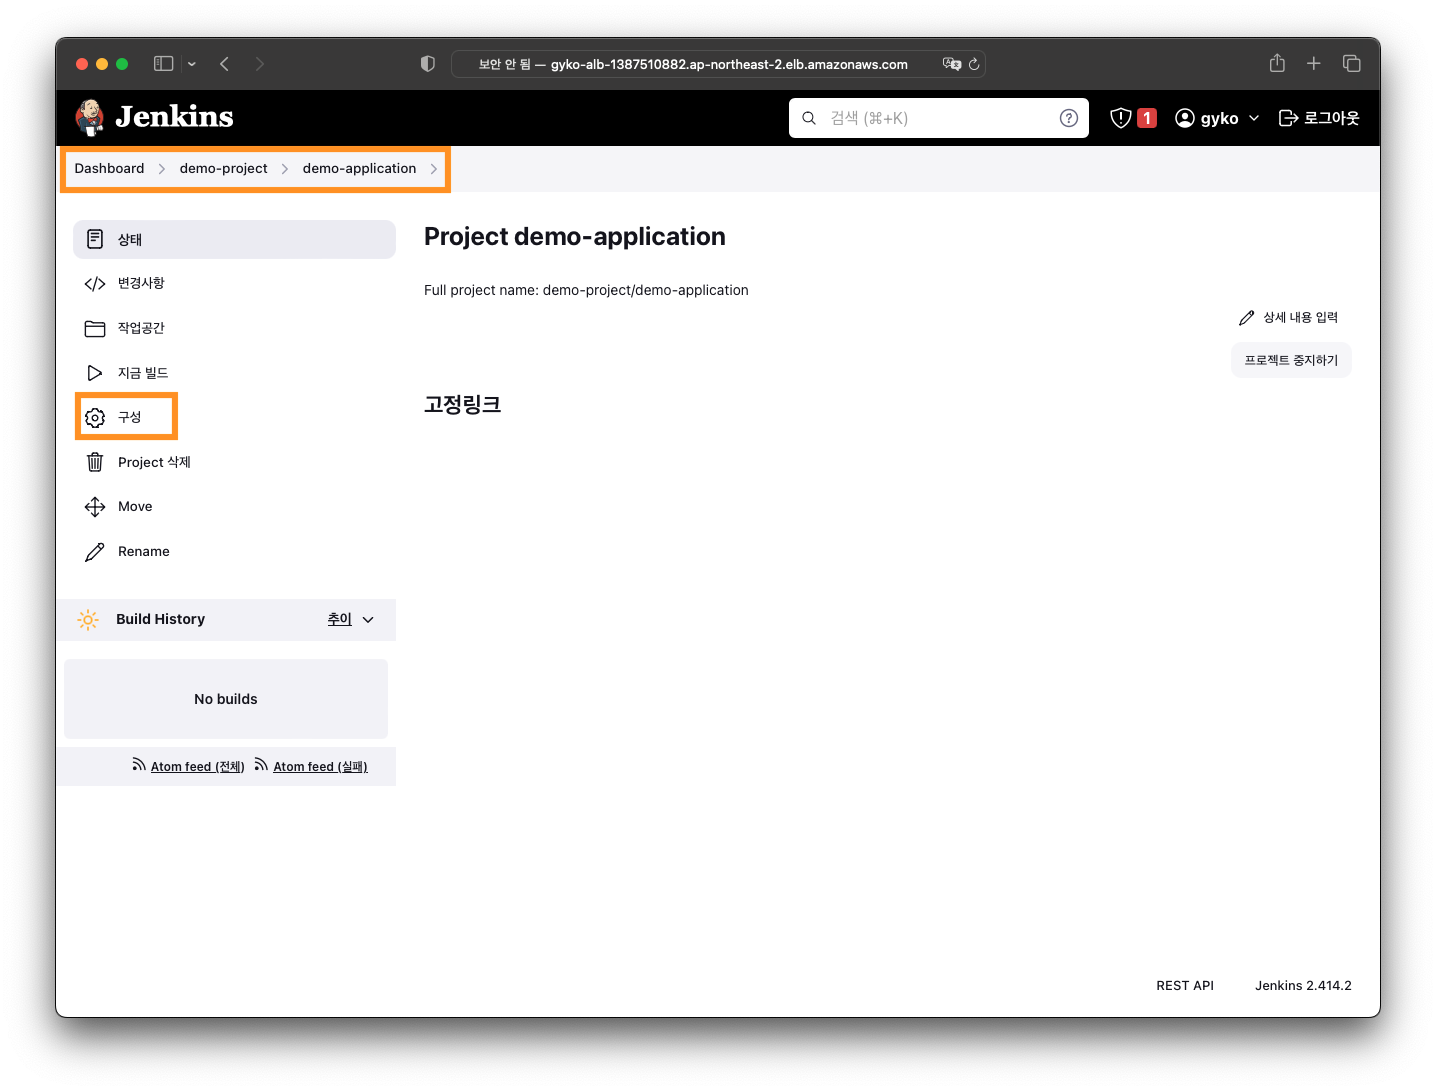
위에서 생성한 demo-application 으로 이동하여 구성을 시작합니다.
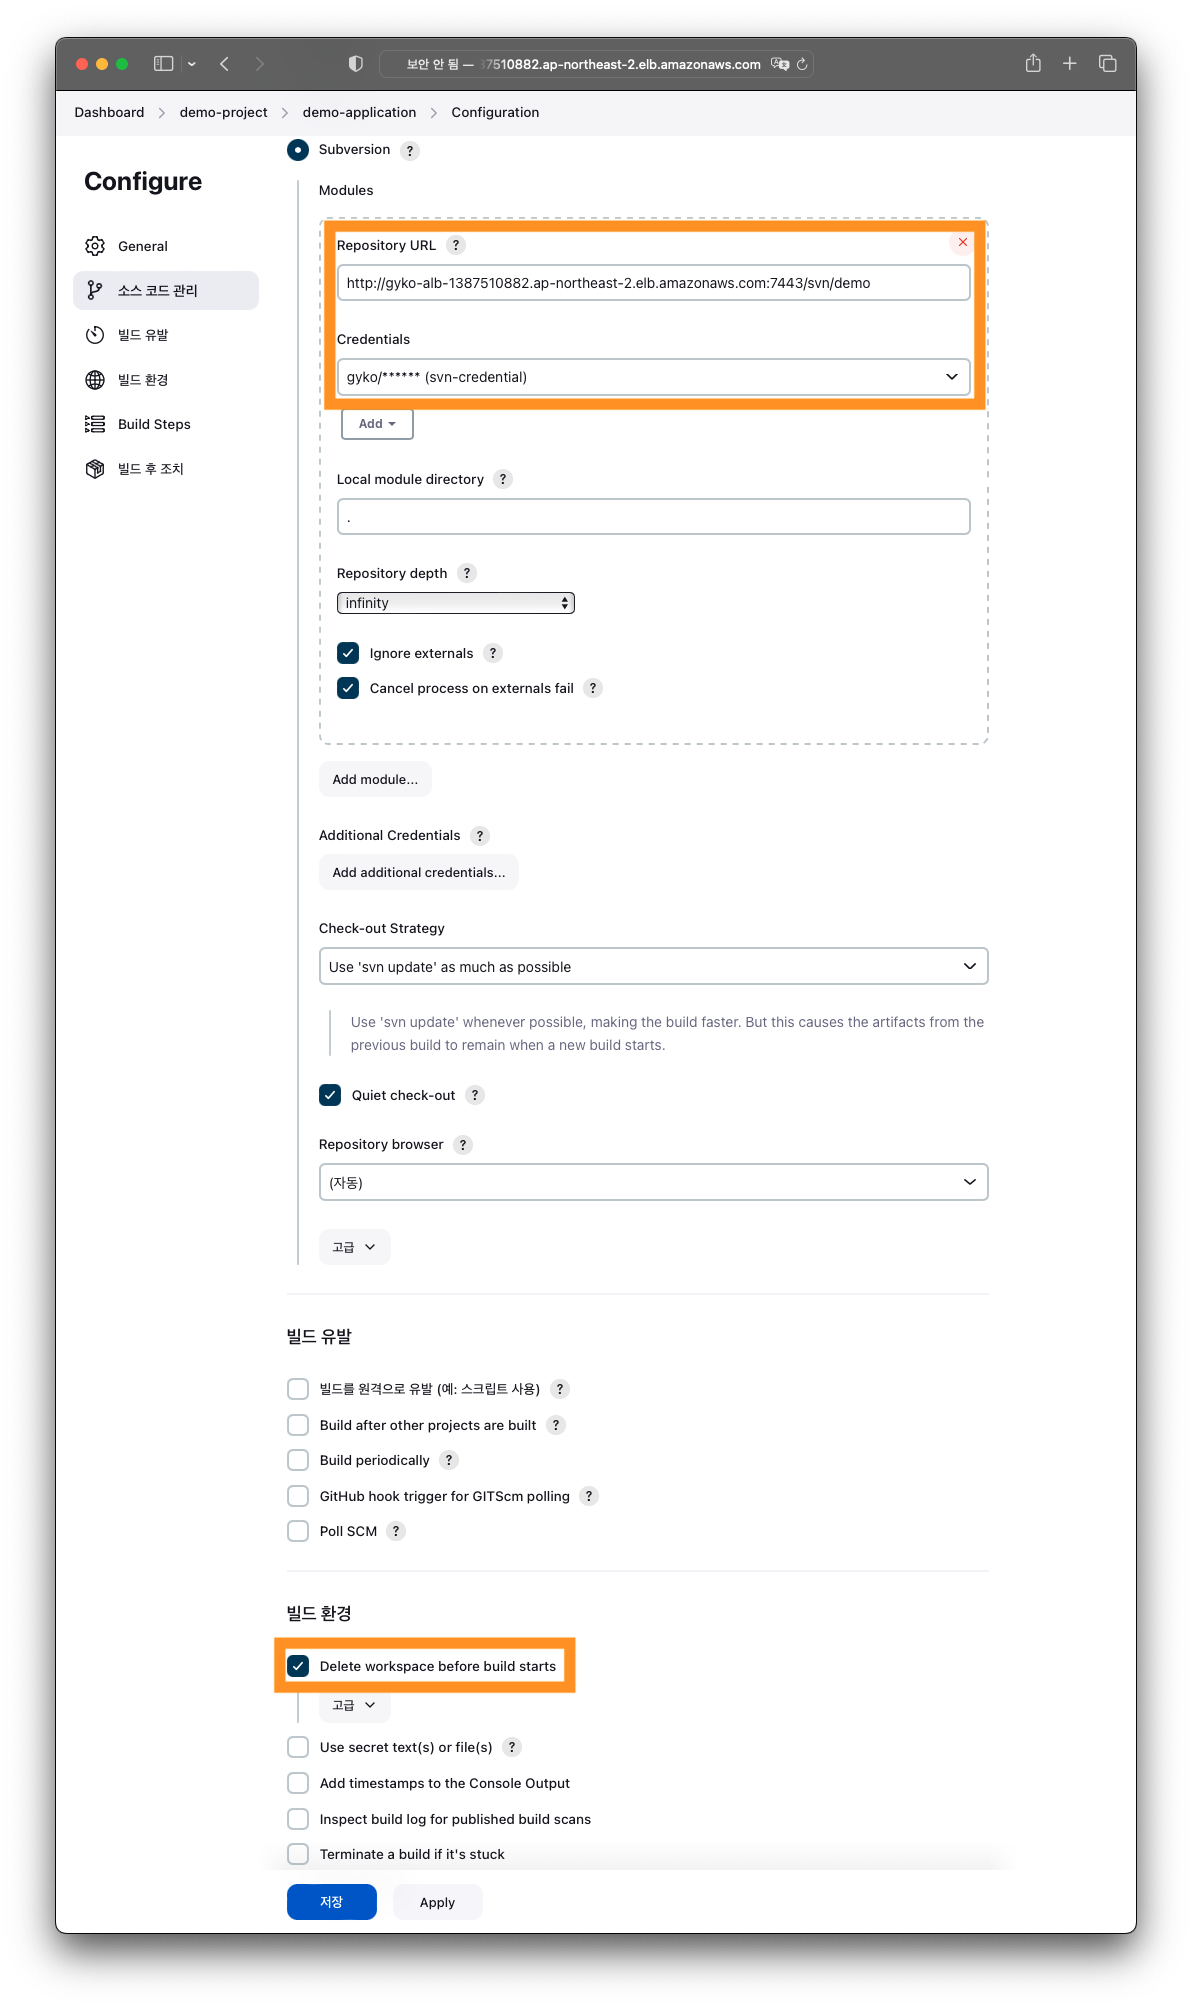
소스 코드 관리에서 Subsersion 을 선택하고 Repository URL, Credentials 을 입력합니다.
빌드 환경에서 'Delete workspace before build starts' 를 체크합니다.
Build 구성
Build Step 및 AWS CodeBuild 를 추가합니다.
AWS CodeBuild Credentials 을 등록합니다.
Project Configuration 에는 AWS Console 에서 생성한 CodeBuild 프로젝트 정보를 입력해 줍니다.

Build Test
Build 가 정상적으로 성공하는지 확인합니다.

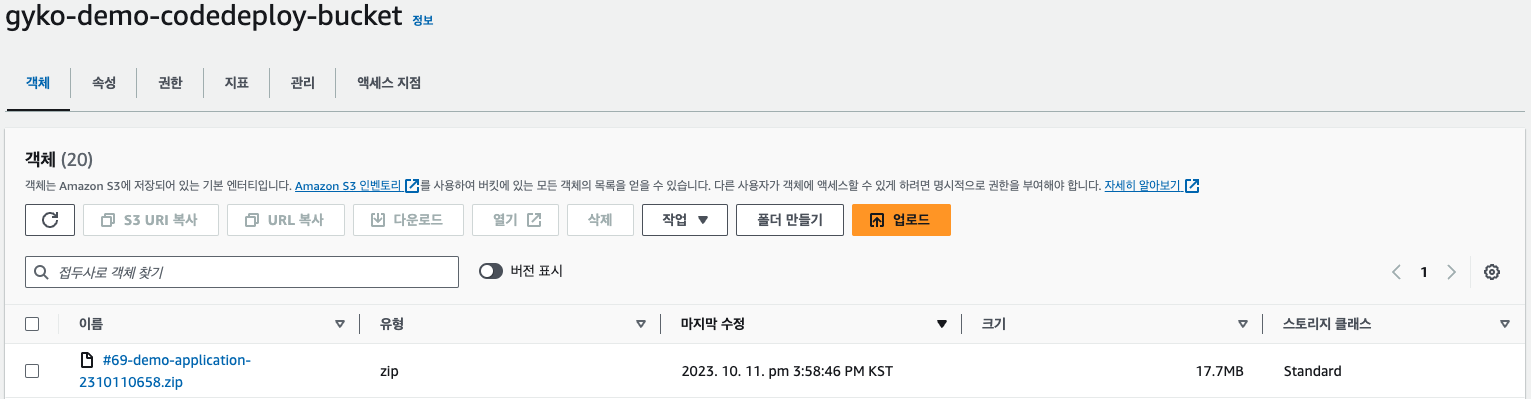
Build output 이 AWS CodeBuild 의 아티팩트에 설정한 S3 로 upload 되었는지 확인합니다.
Deploy 프로젝트 생성
새로운 item 을 클릭하여 Pipeline 프로젝트를 생성합니다.

아래와 같이 프로젝트를 구성합니다.
Active Choices Parameter 를 추가하여 S3 에 upload 된 artifact 파일 정보를 CodeDeploy CLI parameter 로 넘겨줍니다.

Groovy Script 에 아래 code 로 작성합니다 S3 버킷명은 각자 환경에 맞게 수정합니다.
def aws_s3_ls_output = "aws s3 ls s3://gyko-demo-codedeploy-bucket/".execute() \
                       | ['awk', '{ print $NF }'].execute()
aws_s3_ls_output.waitFor() // might be needed if execution is too long
def files = aws_s3_ls_output.text.tokenize().reverse().take(10)

return files
Pipeline 을 작성합니다.

각자 환경에 맞게 아래 pipline script 를 수정합니다.
pipeline {
    agent any
    stages {
        stage('Deploy'){
            steps {
                script{
                    try {

                        sh"""
                            aws deploy create-deployment \
                            --application-name demo-application \
                            --deployment-group-name demo-application-deploy \
                            --region ap-northeast-2 \
                            --s3-location bucket=gyko-demo-codedeploy-bucket,bundleType=zip,key=${params.artifact} \
                            --file-exists-behavior OVERWRITE \
                            --output json > DEPLOYMENT_ID.json
                            cat DEPLOYMENT_ID.json
                        """

                        def DEPLOYMENT_ID = readJSON file: './DEPLOYMENT_ID.json'
                        echo "${DEPLOYMENT_ID.deploymentId}"
                        sh "rm -rf ./DEPLOYMENT_ID.json"
                        def DEPLOYMENT_RESULT = ""
                        while("$DEPLOYMENT_RESULT" != "\"Succeeded\"") {
                            DEPLOYMENT_RESULT =
                                sh(
                                    script:"aws deploy get-deployment \
                                    --query \"deploymentInfo.status\" \
                                    --region ap-northeast-2 \
                                    --deployment-id ${DEPLOYMENT_ID.deploymentId}",
                                    returnStdout: true
                                ).trim()

                            echo "$DEPLOYMENT_RESULT"
                            if ("$DEPLOYMENT_RESULT" == "\"Failed\"") {
                                throw new Exception("CodeDeploy Failed")
                                break
                            }
                            sleep(30)
                        }
                        currentBuild.result = 'SUCCESS'
                    } catch (error) {
                        print(error)
                        echo 'Remove Deploy Files'
                        sh "sudo rm -rf /var/jenkins_home/workspace/${env.JOB_NAME}/*"
                        currentBuild.result = 'FAILURE'
                    }
                }
            }
        }
    }
}
Deploy Test
배포를 테스트합니다.
위에서 생성한 Deploy 프로젝트를 실행하여 Blue/Green 배포가 정상적으로 성공하는지 확인합니다.
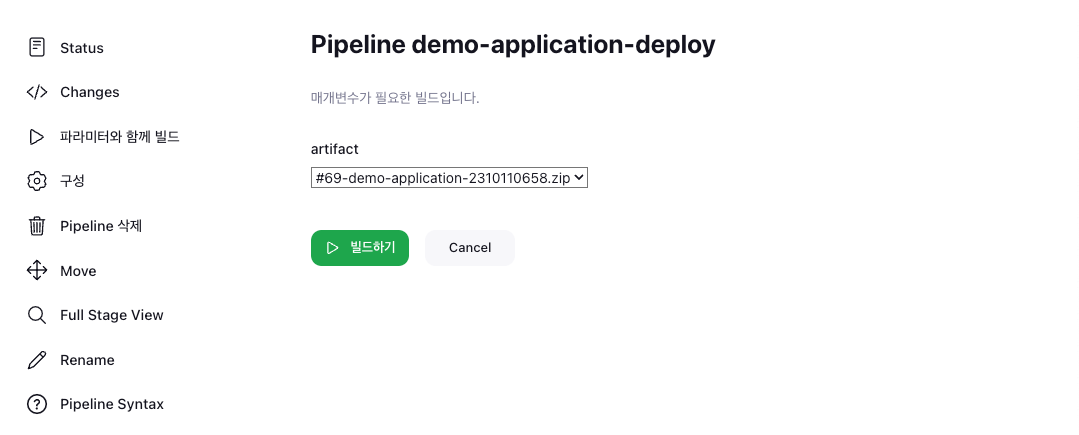
파미미터와 함께 빌드 버튼을 클릭하여 배포할 artifact 를 선택 후 배포를 진행합니다.
artifact 변수는 S3 버킷에 upload 되어있는 artifact.zip 파일의 목록입니다.
배포가 진행중이며 Console Output 에서 진행 상태를 30초 간격으로 확인할 수 있습니다.

AWS Console 로 이동하여 Blue Green 배포가 정상적으로 진행되는지 확인합니다.
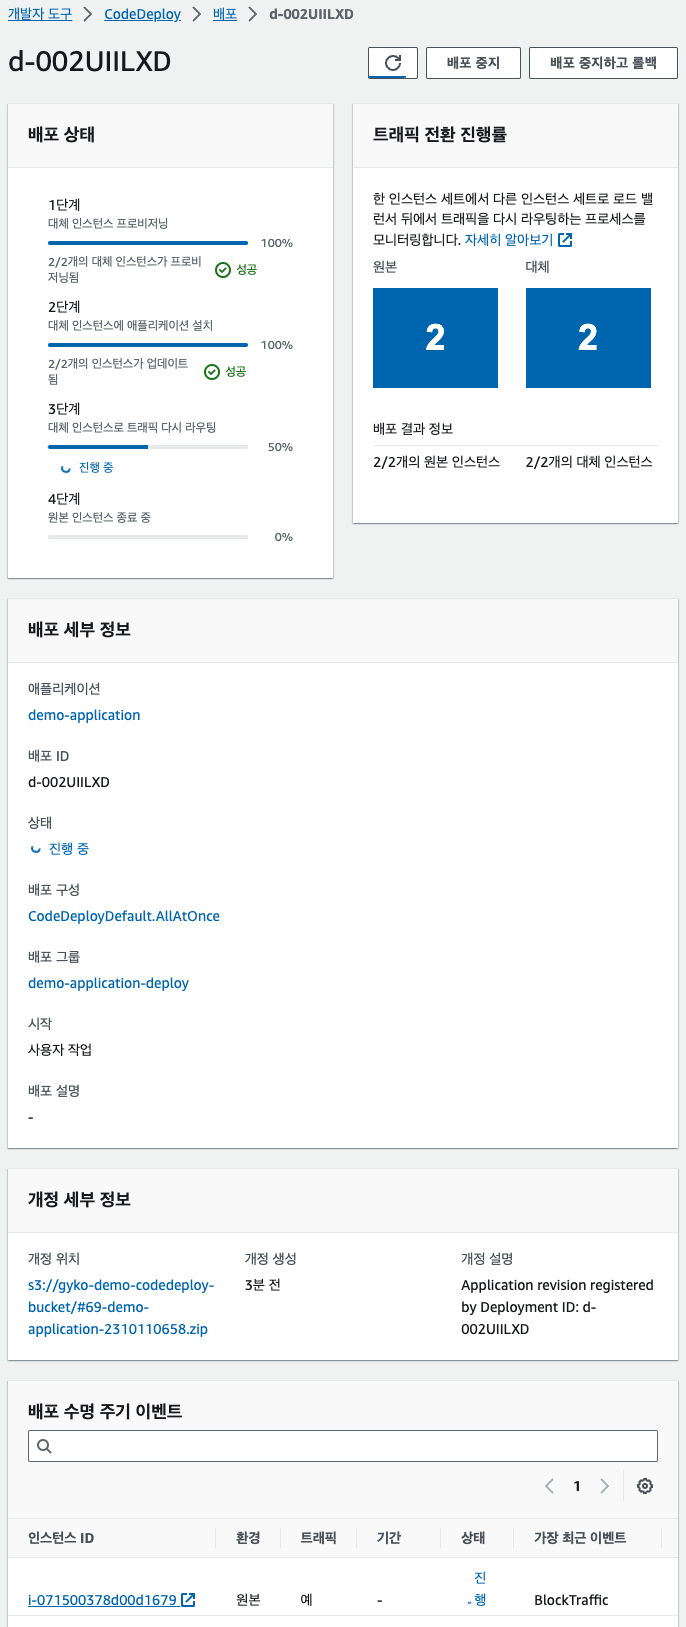
AWS Console 의 AutoScaling Group(ASG) 화면으로 이동해 보면 기존 Application 이 배포된 ASG 를 복제하여 새로 배포할 Application 용 ASG 가 생성된 것이 확인됩니다.

배포에 성공하였고 기존 Application 으로의 Traffic 도 차단되었습니다.

Jenkins console output 에서도 배포 상태 확인이 가능합니다.

Blue/Green 배포에 성공하게 되면 기본 Application 이 배포되었던 ASG 는 삭제되고 현재 배포된 Application 의 ASG 만 남게 됩니다.
다음 배포때에도 마찬가지로 CodeDeploy 가 현재 ASG 를 복제하여 새로운 ASG 를 생성후 새로운 Application 을 배포 및 기존 ASG 삭제 작업을 거치게 됩니다.

ALB 의 domain 으로 배포 내역을 확인합니다.
이상으로 Jenkins, AWS CodeBuild, AWS CodeDeploy 를 이용한 Application Blue/Green Deploymenet 에 대해 알아보았습니다.
AWS CodeDeploy 를 이용하면 AutoScaling 이 적용된 Application 을 Service downtime 없이 손쉽게 Blue/Green 배포가 가능합니다.
The End.
'AWS' 카테고리의 다른 글
| AWS EC2 Blue/Green Deployment (Feat. Jenkins, CodeBuild, CodeDeploy) - Part 1 (0) | 2023.10.05 |
|---|---|
| SSM(Session Manager) Plugin 을 사용하여 Local PC 에서 AWS Private 자원에 접근하기 (0) | 2023.09.19 |
| AWS Lambda 를 이용하여 CloudFront Cache 무효화 처리하기 (0) | 2023.08.29 |
| AWS MSK를 활용한 AWS RDS PostgreSQL CDC (0) | 2023.07.05 |
| AWS에서 Terraform, ECS Fargate 및 CloudMap을 사용하여 마이크로 서비스 인프라를 구축하는 방법 | part 2 (0) | 2023.06.05 |
Contents
소중한 공감 감사합니다